Yoga meditation is a powerful practice that combines physical postures, breath control, and mindfulness to achieve mental clarity and inner peace. One of the essential yet often overlooked components of this practice is the positioning of the hands, known as mudras. Hand positions in yoga meditation are not merely symbolic; they play a crucial role in channeling energy, enhancing concentration, and deepening the meditative experience. This comprehensive guide explores the significance, types, and benefits of hand positions for yoga meditation, enabling practitioners to harness their full potential.
Understanding the Role of Hand Positions in Yoga Meditation
In yoga, hand positions, or mudras, are specific gestures that help regulate the flow of energy within the body. These gestures act as energetic seals that direct prana (life force) through the body’s meridians or energy channels. By adopting a particular mudra during meditation, practitioners can balance their mind and body, fostering a deeper state of focus and tranquility.
Why Are Hand Positions Important?
- Energy Flow: Mudras influence the body’s subtle energies, guiding prana to specific areas to enhance healing and spiritual awareness.
- Mental Clarity: Certain hand positions stimulate the brain, aiding concentration and reducing distractions during meditation.
- Physical Benefits: Mudras can relieve stress, improve posture, and promote relaxation by reducing muscular tension in the hands and arms.
- Symbolism and Intention: Each mudra carries symbolic meaning, helping practitioners set specific intentions or connect with spiritual qualities such as compassion, wisdom, or grounding.
Common Hand Positions Used in Yoga Meditation
Yoga offers a variety of hand positions, each with unique purposes and benefits. Below are some of the most widely practiced mudras in meditation.
1. Gyan Mudra (Mudra of Knowledge)
How to Perform:
- Touch the tip of the index finger to the tip of the thumb.
- Keep the other three fingers extended naturally.
- Rest your hands on your knees with palms facing upward.
Benefits:
- Enhances concentration and memory.
- Stimulates the brain’s nerve centers.
- Promotes calmness and spiritual enlightenment.
2. Chin Mudra (Gesture of Consciousness)
How to Perform:
- Similar to Gyan Mudra, but palms face downward.
- Index finger and thumb tips touch, while other fingers are relaxed.
- Hands rest gently on the knees.
Benefits:
- Grounds the practitioner.
- Promotes inner peace and balance.
- Improves focus and mindfulness.
3. Dhyana Mudra (Meditation Mudra)
How to Perform:
- Place your right hand over the left hand, palms facing upward.
- The thumbs gently touch each other, forming a triangle.
- Rest hands on your lap.
Benefits:
- Deepens meditation by promoting balance.
- Cultivates tranquility and serenity.
- Symbolizes unity and enlightenment.
How to Choose the Right Hand Position for Your Meditation Practice
Selecting the appropriate mudra depends on your meditation goals, physical comfort, and energy needs. Here’s a step-by-step guide to help you decide:
Step 1: Define Your Intention
Ask yourself what you want to achieve through meditation. Is it stress relief, mental clarity, emotional balance, or spiritual awakening? Each mudra supports different intentions.
Step 2: Consider Physical Comfort
If you experience discomfort or stiffness, choose hand positions that feel natural and relaxed. Avoid forcing your hands into unfamiliar gestures.
Step 3: Experiment with Different Mudras
Try practicing several mudras over a few sessions and observe how each affects your mental state and energy flow.
Step 4: Seek Guidance When Needed
Consult a yoga teacher or practitioner experienced in mudras for personalized advice and to ensure proper technique.
Step-by-Step Guide to Practicing Hand Positions in Yoga Meditation
Adopting the right hand position during meditation requires mindfulness and consistency. Follow this structured approach to maximize benefits:
Preparation
- Find a quiet, comfortable space.
- Sit in a cross-legged position, such as Sukhasana (Easy Pose) or Padmasana (Lotus Pose).
- Ensure your back is straight and shoulders relaxed.
Step 1: Choose Your Mudra
- Select the hand position that aligns with your meditation goal.
Step 2: Place Your Hands
- Gently position your hands in the chosen mudra.
- Rest them on your knees or lap, whichever feels more stable.
Step 3: Focus Your Attention
- Close your eyes and bring awareness to your breath.
- Notice the sensation of your hands and fingers.
Step 4: Maintain Steadiness
- Keep your hands steady but relaxed.
- If your hands tremble or shift, gently readjust without strain.
Step 5: Meditate
- Continue your meditation practice, focusing on breath, mantra, or visualization.
- Stay aware of your hand position and its energetic impact.
Step 6: Finish Gradually
- When concluding, slowly release the mudra.
- Open your eyes and bring your awareness back to the environment.
Exploring Advanced Hand Positions and Their Spiritual Significance
Beyond basic mudras, advanced hand positions carry deep spiritual meanings and are used in various yoga traditions and rituals. Here are a few notable examples:
Anjali Mudra (Prayer Position)
- Palms pressed together in front of the heart.
- Symbolizes respect, gratitude, and divine connection.
- Used at the beginning and end of yoga sessions.
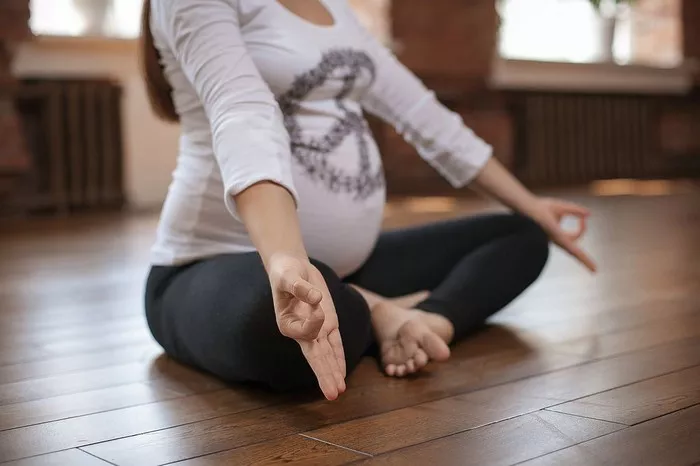
Prana Mudra (Life Force Gesture)
- Tips of the ring and little fingers touch the thumb.
- Enhances vitality and energizes the body.
- Stimulates the root and heart chakras.
Surya Mudra (Sun Gesture)
- Ring finger bends to touch the base of the thumb while the thumb gently presses it.
- Increases body heat and metabolism.
- Supports digestion and immunity.
Common Mistakes and How to Avoid Them
Practicing mudras may seem straightforward, but beginners often make errors that reduce effectiveness or cause discomfort.
Mistake 1: Applying Excessive Force
Pressing fingers too hard can cause tension and disrupt energy flow. Aim for a gentle touch.
Mistake 2: Holding Mudras for Too Long Initially
Start with short durations (5-10 minutes), gradually increasing as your comfort grows.
Mistake 3: Neglecting Posture
Hand positions work best when combined with proper spinal alignment and relaxed shoulders.
Mistake 4: Inconsistency
Regular practice is essential to experience benefits. Skipping sessions reduces effectiveness.
Tips for Enhancing Your Meditation with Hand Positions
Integrating mudras effectively requires mindful attention and consistency. Here are some practical tips:
- Combine with Breathwork: Synchronize mudras with pranayama (breath control) to deepen focus.
- Use Visualizations: Imagine energy flowing through your fingertips and palms.
- Stay Relaxed: Avoid tension in the hands, arms, and shoulders.
- Practice Mindfulness: Be present with the sensations and mental state mudras evoke.
- Create a Routine: Incorporate mudras into your daily meditation practice for lasting benefits.
Conclusion
Hand positions in yoga meditation are more than simple gestures; they are powerful tools to unlock deeper states of consciousness and balance mind and body energies. By understanding their significance, learning the correct techniques, and practicing consistently, you can enrich your meditation experience and cultivate greater well-being. Whether you are a beginner or an advanced practitioner, exploring mudras offers an accessible and profound path toward inner peace and spiritual growth.
Related Topics: